Next.js project starter for large projects

Introduction
Modern web front-end development has become complex and cumbersome. A great number of tools and frameworks exist in the market that basically performs the same function, making it difficult for you to distinguish between the ones that will do the job and those you should pass on.
These days, a front-end app has to handle Server Side Rendering (SSR) and Client Side Rendering (CSR), as well as data hydration between the two, whilst still remaining fast and responsive.
But that’s not all. Components have to be well-documented and easily reusable both for you and other developers in the team.
And on top of that, styling has to be easily extendable and scalable, and it needs to be able to handle accessibility requirements and support dark/light modes.
In this article, I'll attempt to share the tools and practices that helped me to tick all these boxes, and allowed me to successfully build and ship large production projects while helping other developers do so.
Although I've provided React.js-based examples, I believe that you can use the underlying principles in other major JavaScript frameworks like Angular, Vue, or Svelte.
Prerequisites
Before we get started, it’s important to note that you’ll probably need some web development knowledge to follow some of the concepts in this article. TypeScript and some React.js/Next.js-specific knowledge might come in handy too.
You can visit the GitHub repository link and grab the code for reference:
https://github.com/railaru/next-js-project-starter-for-large-projects.
If you're interested in learning more about the tools and concepts discussed here, you’ll find a Further Reading section with some useful links at the end.
Result
By the end of the article, you'll have learned how to structure a Next.js project by analyzing a simple CRUD application that allows users to create, update and delete list items.

1: Connecting our front-end app to a back-end REST API
1.1 SSR and CSR + data hydration
SSR stands for server-side rendering. This means that the page content displayed to the user is first generated on a server and then returned to the user's browser.
It's a must-have feature if you're building an app with dynamic content that will have to have to be indexed on Google and other search engines. For example, an e-commerce store or a marketplace.
For smaller projects like blogs, you could get away with SSG — a server-side generated app that will generate your HTML before deploying to the server. The main drawback here is that if you’re aiming to provide dynamic content that can be updated often, this option is not scalable as each page will have to be generated in the deployment pipeline.
As you've probably guessed, CSR stands for client-side rendering. This means the page content in HMTL is rendered in the user's browser with the help of JavaScript.
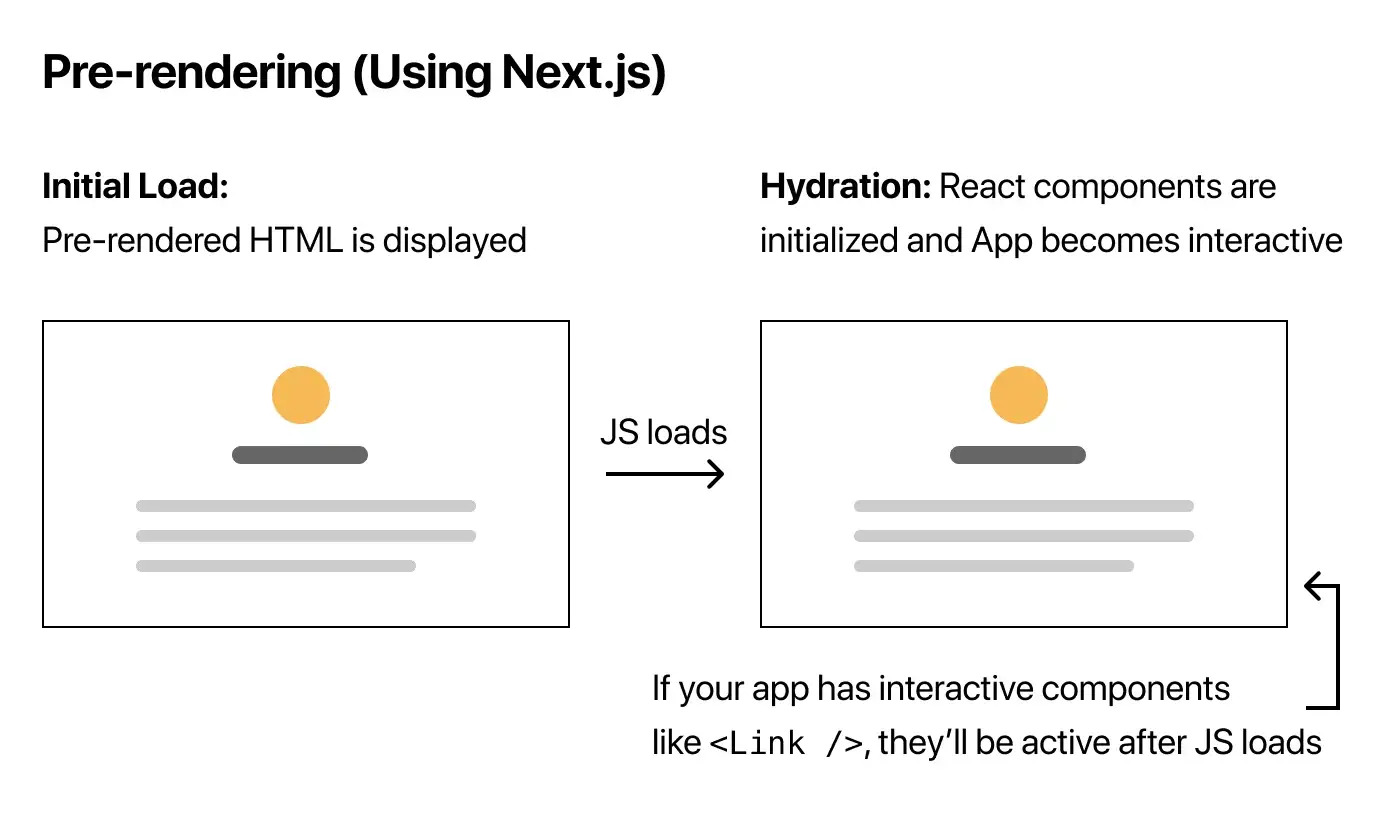
I've attached some graphs from the official Next.js documentation to illustrate these points:

The picture above shows an app designed to paint page content using JavaScript after the initial HTML has been loaded.
The picture above shows an app that will generate HTML on the server and add JavaScript functionality after loading the page.

The tricky part about using SSR is that the data fetched on the server will remain there unless we somehow pass it to the client (browser).
This process is called hydration. You can implement it using many different tools, but my favourite is React Query.
I prefer it because it syncs the data fetched on the client and the server simply and consistently. Plus, it provides excellent development tools for debugging your app.
You can find this code in the repository at _app.tsx

In the screenshot above, the hydration setup is marked out in red.
You can find this code in the repository at examples/index.tsx

The screenshot above shows a getServerSideProps function, which tells Next.js to run this code on the Node.js server you're hosting your app on. This code tells Next.js to fetch some data on the server and then rehydrate it to the client side.
1.2 FE caching using Queries
There are only two hard things in Computer Science: cache invalidation and naming things.
— Phil Karlton
Luckily for us, React Query does all the hard lifting straight out of the box, so we can enjoy the benefits of caching without the headaches that might potentially come with it! Look at the examples below:
You can find this code in the repository at api/queries/example-list.ts

The screenshot above shows two functions. The first one is an async function that is intended to be callable both on the server and client. That’s why the Axios HTTP library is used instead of the default browser Fetch API.
The second function is a custom hook built on top of a React Query hook which calls the fetcher function and stores the data in the cache using the EXAMPLE_LIST query key.
By referring to this key, we can easily access and invalidate the cache created by React Query.
You can find this code in the repository at components/containers/examples/List/List.tsx

The screenshot above shows how easy it is to consume data from React Query and display it using JSX markup on the page.
Our custom useGetListItems() hook takes the asynchronous fetcher function as a given parameter but returns data synchronously, meaning that all we need to do is to check if the data is truthy, and we're ready to loop it and display it in the UI.
Another thing that's handy about using this approach is that once the data is cached in a central place, your components won't make unnecessary API requests. See the examples below:
You can find this code in the repository at pages/examples/index.tsx

The screenshot above shows the same List component included ten times on our page. What’s important to note here is that we don't need to pass the data fetched using getServerSideProps through the component props - it remains available through the use of our client-side hook useGetListItems without the screen flickering when the page is loaded.
This means that React Query can handle the hydration of the server and client side behind the scenes, and your data is available in both places.
Ow, it looks messy!

In the screenshot above, the UI looks cluttered. This is because, as you’ve no doubt guessed, we copied and pasted the <List /> component several times.
However, the exciting part is that if you look at the Network tab inside your browser's inspect tools, there's only one request for the list, not ten!
Wow, look at this clean, shiny single list HTTP request!

This type of caching is super helpful when it comes to dealing with large apps where you might need to display different data from the same API endpoint in different sections of the page, but you only want to call it once for performance reasons.
1.4 Data mutations
We’ve previously talked about Queries, which in the context of React Query are just a fancy name for GET HTTP requests.
Now let's talk about handling the rest of our app's HTTP POST, PATCH, PUT and DELETE requests.
As you've probably guessed, the name mutation comes from the fact that this action mutates or changes our data on the server.
Let's look at some examples:
You can find this code in the repository at components/containers/examples/List/List.tsx

In the screenshot above, you can see an example of a delete list item mutation. It takes an asynchronous function 'deleteListItem' as the first argument, and in the second argument, we can tell React Query what we want to happen if our requests succeed or fail.
If the request succeeds, we will clear the cache using the same query key we used for our SSR pre-fetch and our CSR custom hook.
If the request fails, we’ll simply set some local React state to show an error alert.
In the GIF below, you can see how this looks in our UI:

What’s interesting is that using the MUI library and React Query makes it easy to animate the loading state of the delete action. We’ll talk more about this later in the article.
Now, let’s simulate a server returning a back-end error to the front-end to show an informational flash message:

1.5 Handling loading state
From a user experience point of view, the best loading state for an app is not having any loading state.
The users simply expect the data they care about to already be there when browsing your app.
If your infrastructure allows it, and you can use SSR for your app, you can solve this by pre-fetching the data on the server and returning already formatted HTML to the client. Using this approach, you’ll be able to give users their data back as soon as they load the page.
For actions the user performs after the page is loaded, like form submissions and loading content inside modals or tabs, you can use animated spinners and skeletons to indicate that the action is taking some time.
Let’s have a look at a real-world example:

In the GIF above, you can see that while an individual list item is being loaded, there’s a brief moment where as a user you can see some blocks which are blinking, the so-called skeletons.
Notice that after I click to open the same modal for the second time, our cache returns the data instantly, so I don’t have to look at the loading animation for the same item more than once.
Achieving this is easy with our setup; let’s have a look at some code:
You can find this code at components/containers/modals/examples/EditListItemModal/EditListItemModal.tsx

In the screenshot above, you can see how using our custom query hook allows us to pull out the loading state if the data is still loading.
1.3 Mock API
In the project starter, you can also find a mock JSON API. It supports all HTTP methods, so you can work on your front-end application while the back-end is still in progress.
Mock JSON server

Mock JSON database

2: Writing UI Components
2.1 Component naming structure: layouts, containers and presentationals
There’re many different ways to name and structure components. What’s important is that your structure allows you to have a clear separation of concerns. You should be able to tell what each component will do just by looking at the folder name, even if it includes 50+ components.
Below I’ve outlined a way that has worked well for me:
In this illustration, you can see a way to name and structure components that have worked well for the projects I’ve worked on.

Layouts: Layout components are responsible for the layout of your page. They handle your HTML head include, including modal outlet, header, navigation bar and footer, and place the actual content on your page.
You can find this code at components/layouts/Basic.tsx

In this screenshot, you can see a simple layout component example. Notice how it only includes markup and no logic. By not including any logic that our container and presentational components would then rely on, we can reuse our containers in all the different layouts much more quickly and with less overhead.
Containers: Out of all components, container components contain the most component-level UI logic. They also have access to hooks and services that handle our app actions. For example: useRouter, useTranslation, useFormik, useQuery, useMutation, useEffect, useState.
You can find this code at components/containers/examples/List/List.tsx

In the screenshot above, you can see an example of a container component. Note that it has access to the data from the API, action handlers and even third-party imports for animations.
Side note: I find it helpful to abstract larger code blocks for logic into separate files and place them in the utility folder as functions. It makes components easier to maintain and test. More on that in the utilities section
Presentationals: presentational components are the smallest building blocks of your app. They don’t have access to services and hooks; essentially, all they do is display and send user-entered data back through props to the parent container.
By not having any component-level logic in your component, you can reuse them much easier in more places in your app because these UI elements have no dependencies.
Examples include Buttons, Inputs, Cards, Images, etc.
2.2 Storybook documentation
Although for smaller projects, you can get away with a simple kitchen sink page where you place all your components for other team members to see visually, for large projects, you need a more organized way to document your UI elements.
Storybook has become an industry standard and is easy to set up and maintain. I find it helpful to place each component in its own folder rather than in a separate Storybook folder. This keeps the code more organized, especially as your project grows and you create many components.
You can find the code for this Storybook example at components/presentationals/Button/Button.stories.tsx

2.3 Using folder names based on a business case to structure components
As your project grows, it is helpful to start splitting your components into subdirectories. The folder naming should be synced with your API documentation, React Query Keys and the app's actual functionality.
Below I’ve added a couple of examples of project file trees to better illustrate this:
An example that is hard to scale:
components/
<NewsletterForm />
<ImageGallery />
<LandingPageNewsletterForm />
<LandingPageImageGallery />
An example that is easy to scale:
components/containers/
common/
NewsletterForm/
<NewsletterForm />
NewsletterForm.stories.tsx
ImageGallery/
<ImageGallery />
ImageGalleries.stories.tsx
landing-page/
NewsletterForm/
<NewsletterForm />
NewsletterForm.stories.tsx
ImageGallery/
<ImageGallery />
ImageGalleries.stories.tsx
Structuring component folders gives us the following advantages:
- Shorter component names, clearer JSX markup when reading code
- With each new functionality you can create a new sub-folder instead of making the component names increasingly longer and more specific.
- Navigating a large codebase is more manageable and takes less time because you can go from the top down to a specific business case.
For example: components/containers/profile/analytics/charts/DonutChart/DonutChart.tsx
Note: the folder naming should happen inside the component type folder (layouts, containers, presentationals) to keep the separation of concerns intact from the code point of view.
3: CSS Styling
There are probably more ways to style your app than fish in the ocean.
You have naming pattern-based approaches like BEM and OOCSS, CSS in JS solutions like styled-components and Stitches, complete UI frameworks like Material Design and Ant Design, isolation-based tools like CSS modules and utility-based tools like Tailwind.
All approaches are equally viable. Whatever choice you do make, however, must be based on a thorough consideration of the following criteria:
- Scalability: what happens when your app grows in codebase size and your team in headcount? Does the CSS bundle size keep growing, or does it stay the same? Can multiple team members work on new features without experiencing styling collisions for their components?
- Performance: I’ve already mentioned the CSS bundle size. But what about browser performance when resizing the window? How fast does your site repaint CSS? How long does it take for your local environment to refresh when changes are being made to your styling? How many files are responsible for styling in your codebase?
- Maintainability: How maintainable is your styling? How easy it is to update, refactor and change how your app looks, what spacing proportions does it have? How fragile is your styling to CSS class name collisions - could the fixing of one one button’s styling cause your checkout page layout to brake?
- Readability: How readable is your code for styling? How easy is it for a developer who has never worked on your app to jump in and start making changes? Does your styling structure remain readable when you have to write snowflake (unique) components and handle non-standard styling cases? Is your styling readable when applying dynamic class names based on user action?
3.1 Using Tailwind for Scalability and maintainability
In my experience, Tailwind is the styling tool that ticks most of the requirement checkboxes listed earlier.
Isolation and CSS in JS solutions vs Utility-based solutions for styling.

The red line in the graph above shows that the typical styling solutions have a steep curve of CSS bundle size growth at the beginning of developing a new project that flattens over time.
This happens because the team is able to start reusing already-made components once they have been in development for some time. New CSS will, however, have to be added over time to implement new features. This will inevitably mean that the bundle size will continue to increase over-time
Looking at the blue line, you can see that with Tailwind, CSS bundle size growth is minimal because all the classes you might need are already pre-generated. The line still experiences a slight increase in those cases where you choose to add some third-party libraries that also have some CSS.
The only real downside with using Tailwind is code readability, especially if you or your team members haven’t worked with it before. It might take some time to get used to, but once you do, you’ll likely start wondering why you were writing CSS in any other way.
Here are some pointers that help me to write cleaner Tailwind code:
- Keep your components small; since you have all the CSS you might need already pre-generated, it’s tempting to start making huge components with large blocks of HTML markup. Even if your components can be classified as presentational, it’s still easier to read several small components than one large component.
- Use classnames styling library in addition to Tailwind to make dynamic styling a nice, clean, declarative breeze. It helps you create different variants of your components, as well as handle different validation states.
- Use an IDE extension (available for both Vscode and JetBrains products) for sorting your Tailwind classes in a consistent order. I’ve included some suggested extensions at the end of the article.
- Personally, I find that using classes with Tailwind ‘@apply’ directive is a bit redundant if you’re already using a UI framework like React. Frameworks like React, Vue, Svelte, and Angular already provide the component paradigm, so I find no need to also use CSS classes. For example, a ‘<Button />’ component doesn’t need a class ‘.button’. You can just apply your utilities directly in JSX and treat only the component as an abstraction, not the component and the classes that are used to style it.
3.2 Accessibility and dark/light mode
Accessibility: Implementing effective web accessibility can be a challenging and time-consuming task. It’s important to have it in your app, though, especially if your app features publicly indexed pages and you want to ensure the best possible experience for the broadest audience.
To accomplish this, I prefer widely used frameworks like Material Design for React (MUI). This ensures that the components provided by such frameworks are well-tested for all possible accessibility edge cases.
I tend to use MUI for components like Dialogs, Radio buttons, Checkboxes, Autosuggests, Tooltips, and Animations.
That way, I can cover most of the app’s accessibility needs while still having a lot of flexibility to implement custom components using =Tailwind, which offers me the ability to give the app a unique look and feel, one that’s different from a simple customized MUI setup.
Dark mode: In the past, implementing dark mode was quite tricky. Luckily tailwind makes it really easy to use dark mode by using the ‘:dark’ directive. Under the hood, it uses the default prefers-color-scheme browser API. This connects to your device’s system preferences for appearance mode.
Dark UI example in the browser

In the screenshot above, you can see the usage of Tailwind’s :dark directive. You can find this code at: components/presentationals/examples/ListItem/ListItem.tsx

In the screenshot above, you can see a Dark system preference.

In the screenshot above, you can see that the UI of this example app reverts to bright when system settings are turned to light mode.

4: Testing our App
Automated testing is an essential process for rapid and agile development. It’s worth noting straight off the bat, however, that it’s important to select which things require testing and which ones are redundant for testing.
In a front-end codebase, testing is beneficial only in very specific places of the codebase if you’re using TypeScript (synced with a back-end API documentation) and have a clear separation of concerns in your code.
In my experience, when you are working on many different projects of various sizes, the use of such tools as React Testing Library to test the actual UI components can become:
a) Unreliable - this is because you’ll likely have to mock every service you use (fetching data, using translations, global state, etc) you’ll be simulating and assuming how your real app will function, which might leak some untested cases.
b) Redundant - React itself is very well tested. So, testing if your button click has changed the state is not really testing anything that might break. If your component does include complex UI logic, it can be abstracted into an utility function to make it straightforward to unit test.
To be clear, I still think that testing is hugely important, especially when it comes to refactoring your app and building new features fast. I’m just pointing out that testing React components themselves has not really been effective in my experience.
Below I’ve listed some ideas that I’ve found that help you to effectively build an infrastructure that encourages you to write good tests rather than forcing it into places where tests are not beneficial.
4.1 Unit testing
As you can see in the project starter setup, things like handling the server and client global state have already been solved by React Query and Zustand, respectively. Pages, layout, and presentational components do not hold any front-end logic. So, the only place we can find component-level logic is in the components folder.
As I’ve mentioned, abstracting component logic into utility functions makes testing far easier. Once I know that my app has a reliable architecture and separation of concerns overall and I only need to test small utility functions, all I need is a basic Jest setup with TypeScript.
In the screenshot above, you can see an example of a unit test using Jest & TypeScript. You can find this code at tests/unit/example.spec.ts

Testing this way reduces the number of mocks and fixtures that are needed to test an app. This makes the unit testing on the hand more isolated while at the same time, closer to how your app runs in production.
4.2 E2E testing
Once you have covered more complex functions of your app with unit tests, it’s crucial to add E2E tests to test the app’s overall flow from the user's point of view. In the screenshot below, you can see a basic E2E test written for cypress:
You can find this code at: cypress/e2e/example.cy.ts

This project setup includes a TypeScript and Cypress setup, which I’ve found to work well for writing reliable, fast, end-to-end tests. It also has a user-friendly UI for running individual tests if you need to debug a failing test through Cypress’ Chrome browser visual driver.

5: Making our App multi-language
5.1 I18n setup
This project starter features an I18n setup for both SSR and CSR. This will allow your app to be translated on the server and on the browser, giving you more flexibility for SEO optimization and a better user experience, because the translations are pre-loaded before the page is shown in the user’s browser.
In the screenshot below, you can see how to initialize translations for SSR. In Next.js, this is done at the page level either in getServerSideProps or in getStaticProps.
You can this code at pages/examples/index.tsx

In the screenshot below, you can see the usage of translations in the CSR section of the app. Notice how the same namespace is specified as it is in the SSR section.
You can this code at pages/examples/index.tsx

Note: unlike in the SSR section, where you specify translation namespaces once at the page level, CSR translations need to be included in each child component of that page.

In the gif above, you can see how the text inside that app changes based on the specified locale (in this case, there are two locales: lt-LT and en-GB).
Notice how there’s no flickering effect when the page loads. This is possible because the translations are baked into the HTML template on the SSR side.
5.2 Different namespaces
I find it useful to split the app’s translations into different namespaces for larger projects. This helps with:
a) Performance -Next.js will only load the translation files you’ve specified for a page.
b) Teamwork - having only one translation file might cause git conflicts if you work on different features together with your team in parallel.
In the screenshot below, you can see the translation configuration for this example project. It includes locale and translation namespace settings for the app.
You can find this in the root directory at next-18next.config.js

6: Keeping the global state management simple
When it comes to choosing global state management tools for a front-end app, I find it really helpful to evaluate the business case and planned app features to weigh the trade-offs and make a choice based on that.
For most apps like marketplaces, SAAS solutions, and e-commerce stores, most of the features will revolve around CRUD operations. I would choose a mix of server and client global state managers for an app like that.
6.1 Server state
The server state is fundamentally different from the client state. It deals with data which is not stored in the user’s browser, and as a front-end web app developer, you can’t make reliable assumptions of what the state of that data is, or what it might cause to mutate.
This is where tools like React Query and RTK query come in handy. They sync your UI with the server and make managing cached data and loading state declarations straightforward. You can find examples of how to use React Query as a server state manager in the article section 1.
6.2 Client state
Client state is simply a state that handles your app’s state until a user refreshes the page. Or, in other words, it does not persist in a database. I find this useful for things like triggering flash messages, opening dialogs and modals.
You can find the Zustand store for global state management in this project starter setup. It adds minimal boilerplate to the project, the syntax is the same as the default React useState syntax, and the performance is fast.
Zustand even supports transient updates, which minimizes the re-render of the virtual DOM for places in your app where you know you want to constantly update the UI (like charts or logs).
In the screenshot below, you can see a basic Zustand setup with TypeScript. It controls the app’s dialogues, allowing developers to open and close modals from any place in the code.
You can find this code at store/modals.ts

Unlike other large and heavy state managers (I’m looking at you, Redux), it doesn’t require any additional boilerplate to connect it to our app. You can simply import the store you’ve created to your component and start using it as you would a regular React state.
You can find this code at components/containers/modals/ModalOutlet/ModalOutlet.tsx

In the GIF below, you can see React Suspense and Zustand in action together. It lazy loads JavaScript code for our <EditListItemModal /> only after the user opens the modal.
In this GIF, you can see Chrome’s inspect window with the Network tab open and the JavaScript filter active.

7: Keeping the code clean by linting
Linting is an essential part of any project. It takes time to set it up upfront, but it delivers enormous benefits later down the road.
Instead of arguing in merge requests and creating endless discussion threads, it’s better to agree with your team on what code standards you want to follow, plug them into a listing system and let the IDE formatting do the work for you.
7.1 TypeScript
Next.js supports type checking at build time out of the box. This means that when set up correctly, it will check all the dependencies and data types of your app before you ever deploy to production.
This project starter comes with TypeScript preconfigured, you can find the configuration in the tsconfig.json file at the root directory.
The same TypeScript configuration is used for Jest and Cypress, I find it easier to maintain one configuration as opposed to several configurations.
7.2 Eslint
Eslint is responsible for JavaScript, TypeScript, React and Next.js code rules.
You can customize the rules and plugins for it in .eslintrc.json
7.3 Prettier
Prettier handles the settings for how the code looks. Things like tab width, print width, semi-columns, etc. Make sure that your IDE formats the code based on each save; this way, you can save time because your code will be formatted automatically.
Prettier formatting in action after pressing cmd + s on my keyboard.

You can customize prettier settings by adjusting the .prettierrc.js file in the root directory of the project starter.
8: Organizing utilities, constants, models and hooks
8.1 Utilities
I tend to place all utilities inside the ‘utilities’ folder. These are most commonly used to format currency, numbers, and dates. Then I simply import them to container components, allowing me to skip having to repeat the same logic more than once inside the codebase.
Below I’ve attached a screenshot for an example utility function that sorts a given array of scores by the highest.
You can find this code at utilities/example.ts

8.2 Constants
I like to store globally used variables inside the constants folder.This reduces the amount of variable mistypes and lets new team joiners see what kind of API resources and routes the app has just by looking at a few files.
Below I’ve attached a screenshot of how I use constants for React Query keys:
You can find the QUERY_KEYS object at constants/api.ts. By searching for this key in your IDE, you can see all the places it’s used in the app.

As you can see, the same query key is used in all the app's create, read, update and delete operations.
8.3 Models
As was the case for constants, new team members should be able to tell what kind of app this is just by looking at the models folder.
It should store types and interfaces that your components, utilities, queries and mutations consume.
If you have access to Swagger or open API documentation, I recommend generating models dynamically; that way, they’re always synced with the current models of the API your app is consuming.
You can this file at models/api.ts

8.4 Hooks
Custom react hooks are helpful when you need to use React’s functionality without rendering something to the DOM.
They’re different from utility functions as they only run on the client side and can inject other hooks into them. This allows you to do things like formatting an API response and the need to append translated values.
Custom hooks are also helpful when you have a repeating piece of React code. For example, client-side validation. I’ve added an example screenshot of the formik validation hook:
You can find this code at hooks/validation/examples/useListItemValidation.ts

Conclusion
In this article, we’ve explored a blank Next.js project in order to analyze actions like communicating with back-end APIs, the handling of SSR and CSR, documenting and structuring components with scalable styling, testing and more.
I hope you’ve been able to pick up some useful tips and insights along the way. Happy coding!
Project starter GitHub repository link
https://github.com/railaru/next-js-project-starter-for-large-projects
Further reading
What is CRUD? https://www.codecademy.com/article/what-is-crud
Pre-rendering and Data Fetching with Next.js: https://nextjs.org/learn/basics/data-fetching/pre-rendering
Classnames styling library: https://www.npmjs.com/package/classnames
Tailwind IDE formatters: https://plugins.jetbrains.com/plugin/13376-tailwind-formatter, https://marketplace.visualstudio.com/items?itemName=heybourn.headwind
Prefers-color-scheme CSS API https://developer.mozilla.org/en-US/docs/Web/CSS/@media/prefers-color-scheme
Zustand transient updates: https://docs.pmnd.rs/zustand/recipes/recipes#transient-updates-(for-often-occurring-state-changes)